
调整图片大小
resize
Section titled “resize”resize([width], [height], [options]) ⇒
Sharp
将图片调整为 width、height 或 width x height。
🌐 Resize image to width, height or width x height.
当同时提供 width 和 height 时,图片应如何适应它们的可能方法有:
🌐 When both a width and height are provided, the possible methods by which the image should fit these are:
cover:(默认) 保持纵横比,尝试通过裁剪/剪切来确保图片覆盖提供的两个尺寸。contain:保持纵横比,在必要时使用“信箱效应”将内容限制在提供的两个尺寸内。fill:忽略输入的纵横比并拉伸到两个提供的尺寸。inside:保留纵横比,将图片大小调整为尽可能大,同时确保其尺寸小于或等于指定的尺寸。outside:保留纵横比,将图片大小调整为尽可能小,同时确保其尺寸大于或等于指定的尺寸。
其中一些值是基于 object-fit CSS 属性的。
🌐 Some of these values are based on the object-fit CSS property.
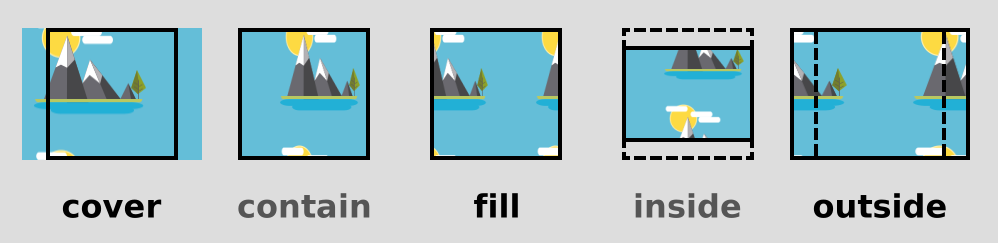
当使用 cover 或 contain 的 fit 时,默认的 position 是 centre。其他选项有:
🌐 When using a fit of cover or contain, the default position is centre. Other options are:
sharp.position:top、right top、right、right bottom、bottom、left bottom、left、left top。sharp.gravity:north、northeast、east、southeast、south、southwest、west、northwest、center或centre。sharp.strategy:仅限 cover,可以动态裁剪,使用entropy或attention策略。
其中一些值是基于 object-position CSS 属性的。
🌐 Some of these values are based on the object-position CSS property.
这种基于策略的方法最初会调整尺寸,使一个维度达到目标长度,然后反复对边缘区域进行排名,根据所选策略丢弃得分最低的边缘。
🌐 The strategy-based approach initially resizes so one dimension is at its target length then repeatedly ranks edge regions, discarding the edge with the lowest score based on the selected strategy.
entropy:专注于具有最高Shannon 熵的区域。attention:重点关注亮度频率、色彩饱和度和肤色最高的区域。
可能的缩小内核是:
🌐 Possible downsizing kernels are:
nearest:使用最近邻插值。linear:使用 三角滤镜。cubic:使用 Catmull-Rom 样条。mitchell:使用 Mitchell-Netravali 样条。lanczos2:使用一个[Lanczos 内核](https://en.wikipedia.org/wiki/Lanczos_resampling#Lanczos_kernel)与a=2。lanczos3:使用a=3的 Lanczos 内核(默认)。mks2013:使用 Facebook 采用的 Magic Kernel Sharp 2013 内核。mks2021:使用 Magic Kernel Sharp 2021 内核,其锐化效果比 2013 版本更精确(锐化程度更低)。
在上采样时,这些核会映射到 nearest、linear 和 cubic 插值器。没有对应上采样插值器的下采样核会映射到 cubic。
🌐 When upsampling, these kernels map to nearest, linear and cubic interpolators.
Downsampling kernels without a matching upsampling interpolator map to cubic.
每个管道只能进行一次调整大小。同一管道中之前对 resize 的调用将被忽略。
🌐 Only one resize can occur per pipeline.
Previous calls to resize in the same pipeline will be ignored.
投掷:
错误参数无效
| 参数 | 类型 | 默认值 | 描述 |
|---|---|---|---|
| [width] | 数字 |
生成的图片应该有多少像素宽。使用 null 或 undefined 来自动缩放宽度以匹配高度。 |
|
| [height] | 数字 |
结果图片应该有多少像素高。使用 null 或 undefined 来自动调整高度以匹配宽度。 |
|
| [options] | 对象 |
||
| [options.width] | number |
指定 width 的另一种方式。如果两者都存在,则此项优先。 |
|
| [options.height] | 数字 |
指定 height 的另一种方式。如果两者都存在,则此项优先。 |
|
| [options.fit] | String |
'cover' |
图片应如何调整大小/裁剪以适应目标尺寸,可选择 cover、contain、fill、inside 或 outside 中的一个。 |
| [options.position] | 字符串 |
'centre' |
当 fit 是 cover 或 contain 时使用的位置、重力或策略。 |
| [options.background] | 字符串 |对象 |
{r: 0, g: 0, b: 0, alpha: 1} |
当“fit”为“contain”时,背景颜色由[color](https://www.npmjs.org/package/color)模块解析,默认为黑色且不透明。| |
| [options.kernel] | 字符串 |
'lanczos3' |
用于图片缩小的内核,以及用于放大时推断出的插值器。使用 fastShrinkOnLoad 选项来控制内核与加载时缩小的关系。 |
| [options.withoutEnlargement] | Boolean |
false |
如果宽度或高度已经小于目标尺寸,则不放大,相当于 GraphicsMagick 的 > 几何选项。这可能导致输出尺寸小于目标尺寸。 |
| [options.withoutReduction] | Boolean |
false |
如果宽度或高度已经大于目标尺寸,则不缩小,相当于 GraphicsMagick 的 < 几何选项。这仍可能导致裁剪以达到目标尺寸。 |
| [options.fastShrinkOnLoad] | 布尔值 |
true |
更好地利用 JPEG 和 WebP 的加载时缩小功能,这可能会导致轻微的摩尔纹或自动缩放尺寸向下取整。 |
示例
sharp(input) .resize({ width: 100 }) .toBuffer() .then(data => { // 100 pixels wide, auto-scaled height });Example
sharp(input) .resize({ height: 100 }) .toBuffer() .then(data => { // 100 pixels high, auto-scaled width });Example
sharp(input) .resize(200, 300, { kernel: sharp.kernel.nearest, fit: 'contain', position: 'right top', background: { r: 255, g: 255, b: 255, alpha: 0.5 } }) .toFile('output.png') .then(() => { // output.png is a 200 pixels wide and 300 pixels high image // containing a nearest-neighbour scaled version // contained within the north-east corner of a semi-transparent white canvas });Example
const transformer = sharp() .resize({ width: 200, height: 200, fit: sharp.fit.cover, position: sharp.strategy.entropy });// Read image data from readableStream// Write 200px square auto-cropped image data to writableStreamreadableStream .pipe(transformer) .pipe(writableStream);Example
sharp(input) .resize(200, 200, { fit: sharp.fit.inside, withoutEnlargement: true }) .toFormat('jpeg') .toBuffer() .then(function(outputBuffer) { // outputBuffer contains JPEG image data // no wider and no higher than 200 pixels // and no larger than the input image });Example
sharp(input) .resize(200, 200, { fit: sharp.fit.outside, withoutReduction: true }) .toFormat('jpeg') .toBuffer() .then(function(outputBuffer) { // outputBuffer contains JPEG image data // of at least 200 pixels wide and 200 pixels high while maintaining aspect ratio // and no smaller than the input image });Example
const scaleByHalf = await sharp(input) .metadata() .then(({ width }) => sharp(input) .resize(Math.round(width * 0.5)) .toBuffer() );extend
Section titled “extend”extend(extend) ⇒
Sharp
使用提供的背景颜色或从图片中获取的像素,扩展/填充/拉伸图片的一个或多个边缘。此操作总是在调整大小和提取之后进行(如果有的话)。
🌐 Extend / pad / extrude one or more edges of the image with either the provided background colour or pixels derived from the image. This operation will always occur after resizing and extraction, if any.
投掷:
错误参数无效
| 参数 | 类型 | 默认值 | 描述 |
|---|---|---|---|
| 延伸 | 数字 |对象 |
将单个像素计数加到所有边上,或一个具有每条边计数的对象 | |
| [extend.top] | number |
0 |
要添加到顶部边缘的像素数,合法值为 0-100000000 范围内的整数 |
| [extend.left] | 数字 |
0 |
要添加到左边缘的像素数,合法值为 0-100000000 范围内的整数 |
| [extend.bottom] | 数字 |
0 |
底边增加的像素数,有效值是范围在 0-100000000 的整数 |
| [extend.right] | 数字 |
0 |
要添加到右边缘的像素数,合法值为 0-100000000 范围内的整数 |
| [extend.extendWith] | String |
'background' |
使用这种方法填充新的像素,一个选项有:background、copy、repeat、mirror。 |
| [extend.background] | 字符串 |对象 |
{r: 0, g: 0, b: 0, alpha: 1} |
背景颜色,由[color](https://www.npmjs.org/package/color)模块解析,默认为黑色,无透明度。| |
示例
// Resize to 140 pixels wide, then add 10 transparent pixels// to the top, left and right edges and 20 to the bottom edgesharp(input) .resize(140) .extend({ top: 10, bottom: 20, left: 10, right: 10, background: { r: 0, g: 0, b: 0, alpha: 0 } }) ...Example
// Add a row of 10 red pixels to the bottomsharp(input) .extend({ bottom: 10, background: 'red' }) ...Example
// Extrude image by 8 pixels to the right, mirroring existing right hand edgesharp(input) .extend({ right: 8, background: 'mirror' }) ...extract
Section titled “extract”extract(options) ⇒
Sharp
提取/裁剪图片的区域。
🌐 Extract/crop a region of the image.
- 在
resize之前使用extract进行预调整提取。 - 在
resize之后使用extract来进行调整大小后的提取。 - 在固定的操作顺序中,对“先提取-再调整大小-再提取”,使用
extract两次,resize一次。
投掷:
错误参数无效
| 参数 | 类型 | 描述 |
|---|---|---|
| options | 对象 |
使用整数像素值描述要提取的区域 |
| options.left | 数字 |
从左边缘开始的零索引偏移,整数范围在 0 到 100000000 之间 |
| options.top | 数字 |
从上边缘开始的零索引偏移,整数范围在 0 到 100000000 之间 |
| options.width | 数字 |
要提取区域的宽度,整数范围在 0 到 100000000 之间 |
| options.height | 数字 |
要提取区域的高度,整数范围在 0 到 100000000 之间 |
示例
sharp(input) .extract({ left: left, top: top, width: width, height: height }) .toFile(output, function(err) { // Extract a region of the input image, saving in the same format. });Example
sharp(input) .extract({ left: leftOffsetPre, top: topOffsetPre, width: widthPre, height: heightPre }) .resize(width, height) .extract({ left: leftOffsetPost, top: topOffsetPost, width: widthPost, height: heightPost }) .toFile(output, function(err) { // Extract a region, resize, then extract from the resized image });trim([options]) ⇒
Sharp
修剪所有边缘中包含与给定背景颜色相似的值的像素,该背景颜色默认为左上角像素的颜色。
🌐 Trim pixels from all edges that contain values similar to the given background colour, which defaults to that of the top-left pixel.
具有 Alpha 通道的图片将使用 Alpha 和非 Alpha 通道的组合边界框。
🌐 Images with an alpha channel will use the combined bounding box of alpha and non-alpha channels.
如果此操作的结果将图片修剪为无,则不进行任何更改。
🌐 If the result of this operation would trim an image to nothing then no change is made.
使用 lineArt 和 threshold 选项来控制灵敏度。
🌐 Use the lineArt and threshold options for control over sensitivity.
info 响应对象将包含 trimOffsetLeft 和 trimOffsetTop 属性。
🌐 The info response Object will contain trimOffsetLeft and trimOffsetTop properties.
投掷:
错误参数无效
| 参数 | 类型 | 默认 | 描述 |
|---|---|---|---|
| [options] | 对象 |
||
| [options.background] | 字符串 |对象 |
“''左上像素'” |
背景颜色由[color](https://www.npmjs.org/package/color)模块解析,默认为左上像素的颜色。| |
| [options.threshold] | 数字 |
10 |
允许与上述颜色有差异,即正数。 |
| [options.lineArt] | 布尔 |
false |
输入是否更接近线条艺术(如矢量),而非摄影图片? |
| [options.margin] | 数字 |
0 |
在裁剪内容周围留一个余白,整数像素数介于0到10000000之间。 |
示例
// Trim pixels with a colour similar to that of the top-left pixel.await sharp(input) .trim() .toFile(output);Example
// Trim pixels with the exact same colour as that of the top-left pixel.await sharp(input) .trim({ threshold: 0 }) .toFile(output);Example
// Assume input is line art and trim only pixels with a similar colour to red.const output = await sharp(input) .trim({ background: "#FF0000", lineArt: true }) .toBuffer();Example
// Trim all "yellow-ish" pixels, being more lenient with the higher threshold.const output = await sharp(input) .trim({ background: "yellow", threshold: 42, }) .toBuffer();Example
// Trim image leaving (up to) a 10 pixel margin around the trimmed content.const output = await sharp(input) .trim({ margin: 10 }) .toBuffer();